 Hamstead Hall Academy
My Child at School
Click here to access MyChildatSchool
When you have logged in you can view your child's report by clicking on the report tab.
How to Access MCAS Parent App
The app is available to download from the Apple or Google Play stores for use on iPhones or Android smartphones accordingly. Simply search for MyChildatSchool.com and follow the instructions for installation on your phone. Once downloaded an appropriate MyChildatSchool App will appear.
For first use tap the tile, then the home screen and complete the security sections when prompted, as described below.
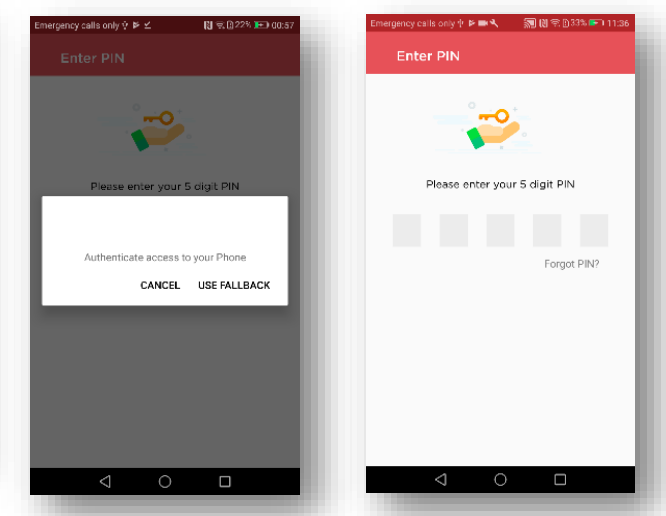
Creating an Account PIN and Authentication Settings
When you access the app for the first time you will be required to create a 5-digit PIN and complete the setup by confirming your biometric authentication settings. For further options on PIN and Authentication Settings, see the Profile section below.
Adding Your User Account Details
Next, enter the email address which you have given to the school. If you do not know your MCAS password, press "Reset Password". You should receive an email detailing how to change your password.
MCAS Parent App Overview
When logging in to your account through the app you only require your PIN/biometric authentication to save having to login with full details each time. From the homepage you will be prompted to complete these details.
A toolbar is permanently displayed at the bottom of the page and all navigation is performed using the toolbar icons, the components of which are described below. The options available are:
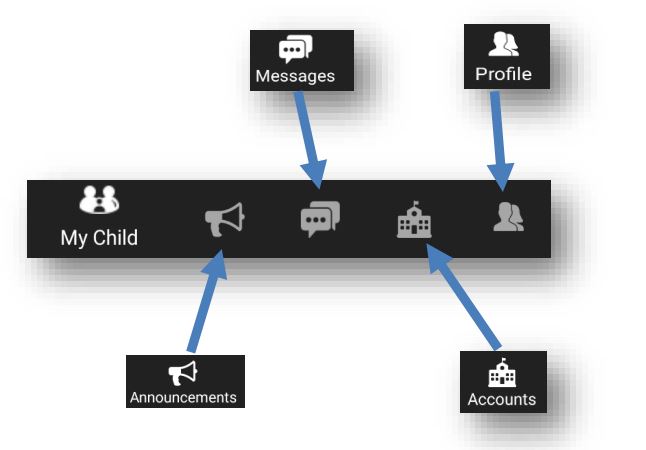
Simply tap an icon to open the feature. To navigate from one feature to another simply tap on the required toolbar icon. A brief description of the functionality of each is described below.
My Child
Tapping the My Child icon will present a student page and a menu icon from which all available student pages may be accessed. To change to a different student page, tap the menu icon or swipe to the right to reveal the Main Menu. The name of the student along with photo, if available, will show and a dropdown arrow will appear to enable the user to switch child, if appropriate.
To hide the Main Menu simply swipe to the left.
Multiple Students
Tapping on the name of the student, next to the photograph, will open a list of other students associated with the User. Tap to switch the tick to a different child and then tap Select. This allows information for more than one associated student to be viewed without having multiple logins.
Options
From the menu, simply scroll and tap the required page. The menu will disappear. To return to the menu, either swipe to the right or tap the menu icon in the top left hand corner of the current page. Use the phone’s back arrow to return to a previous page.
A brief description of all available student pages is described below.
Attendance – Year to date information is displayed as a pie chart in the lower pane. Today’s attendance is displayed in the upper pane. To view attendance throughout the day scroll in the upper pane. Tap the day to reveal a calendar, which will display a colour for each day according to the status of the student’s attendance for that day. Navigation arrows are available to change month and simply tap a day to view the attendance for that day.
Behaviour - Events will appear in chronological order with the latest event at the top of the page. To view more details of an event simply tap it and scroll to view the information recorded. A red cross denotes negative behaviour, a green tick positive behaviour. Use the back arrow to return to the Behaviour Events list.
Academic Calendar – Similar to the Timetable page but when tapping on the day the user will easily be able to view holidays etc. and can navigate through the months by tapping the Calendar directional arrows.
Messages
The Messages feature allows the user to send, receive and reply to messages through the Parent App. Simply tap Messages from the toolbar. To compose a message, tap the pencil, use the dropdown menu to select the recipient of the message (school or teacher if enabled), add a title, compose and Send. To abandon a message, simply tap the X in the Messages heading. To display either Received or Sent messages, simply tap the respective tab and tap again to view the message. A Reply option is available for the message.
Timetable - This page will display as One Day to View. Simply tap the date at the top of the pane and select a day accordingly. Scroll down to see the student timetable for that day.
Accounts
From the toolbar, tap Accounts. This will reveal a page of accounts added to the app. Active accounts will be displayed in green and details will be retained by the app to save the user from having to complete these details each time. Login is by PIN/biometric authentication (depending on what the device supports). Accounts can be deleted and new ones added by tapping the + in the Accounts heading. When creating an account, if the user has forgotten their details, they can simply tap “Forgot Password” which will redirect them to their online MyChildatSchool login page. They can either reset their password or recover their account details.
Profile
From the toolbar, tap the icon on the right hand side to bring up the Profile page. This page contains the following items:
School Contact Information – Tapping on this item reveals the school’s address, email and telephone number. The user may also have the option of sending a message from here to the school, if enabled. To do so, complete the title and message fields then tap Send at the foot of the screen. Responses can be viewed in Messages above.
Account Settings - These are the user’s personal settings and include email address, password and the security details’ question and response. To change any of the fields, simply select Change and then Update once finished. The Security Details section contains a dropdown of available security questions and a field for adding the response.
Change PIN - This item allows the user to change their PIN to access the app by adding the existing PIN and then completing the new PIN details before saving.
Biometric Authentication - To enable or disable this setting simply tap the red button on the slider bar on the right of the field.
Terms and Conditions – These are the company’s terms and conditions of use for the MyChildatSchool Parent App.
How to Access MCAS
From within your web browser type www.mychildatschool.com This will open the login page.
Enter the email address which you have given to the school. Ticking the "Remember Email Address" box will leave just the Password to be entered the next time you log in.
MCAS Dashboard
Once you have logged in the Dashboard will be displayed.
Please Note: What is displayed here is enabled by the school, who may NOT use all of the available options.
Each Widget will display a quick view, clicking on the More button will open that option, giving more detailed information. The Widget options can also be opened from the menu bar on the left by clicking on the option.
For instance the Attendance Widget displays the Attendance for the current day, opening this Widget will display the Attendance for the Academic Year, with a Pie Chart of statistics.
Click on a specific day to see a breakdown of the Attendance for that day.
The Select Subject dropdown menu allows the User to select each Subject to review Attendance per Subject also with Pie Chart Statistics.
You will always know where you are within the MCAS Module.
The following options are available:
- Dashboard
- Data Collection Form
- Announcements
- Attendance
- Behaviour
- Reports
- Timetable
- Academic Calander
- Parental Consent
Multiple Students within MCAS
Clicking on the name of the student, next to the photograph, will open a list of other students associated with the User. Click on the photograph or the text to change views. Allowing information for more than one associated student to be viewed without having multiple logins.
Other options
The other options at the top right of the page.
Clicking on the Telephone icon will open the School Contact details
Clicking on the Message icon will open the Messaging option allowing messages to be sent to and received from the school
Clicking on the Announcement icon will open the Announcement option. A red flag shows that there are Announcements to be read.
Account Options
The dropdown menu beneath the User Name, as well as containing a link to the Message page and the Logout option has options to update and confirm Account, Contact and Student Details.